How To Use This Site
Click the tabs for explanations of how to use different features of this site.
1. Click the Login link in the main menu
2. Click the Forgot Password? link
3. Put in your username and email address
4. Click Submit
5. You will receive an email with a reset link (be sure to check your spam folder if you don’t get it in your inbox within a minute or two).
6. Click the reset link and you should be taken to the reset password screen of the website
7. Enter your username and the password you want to use (at least 8 characters and cannot include parts of your name or email). You will need to enter it twice.
8. Click Submit
9. You should get a message that your password has been reset successfully
10. Click the login link
11. Login with your new password
12. Once logged in, you should see your name and your club in the center of the blue banner at the top.
If it doesn’t work, contact our webmaster.
October 3, 2024 6:45 pm
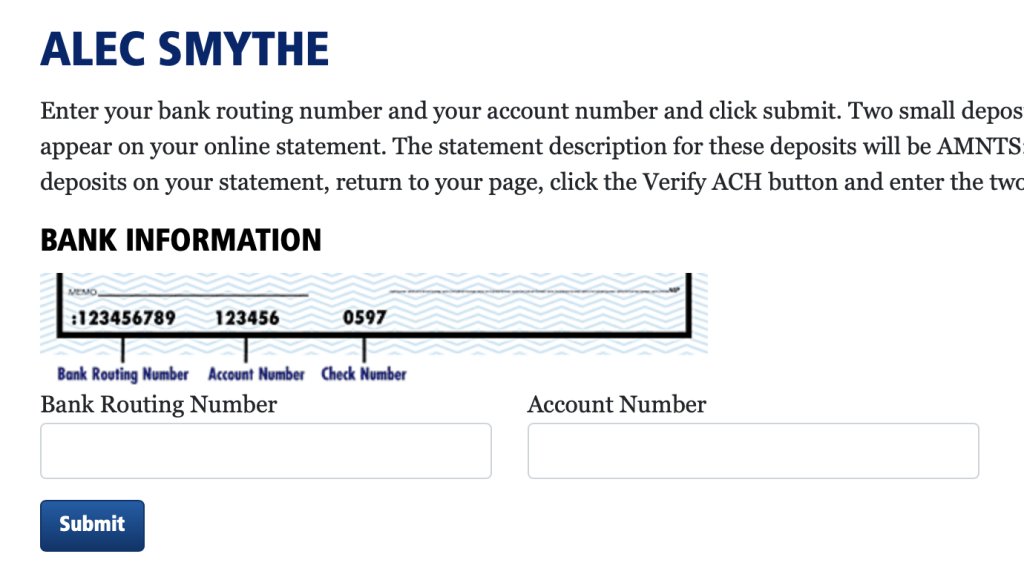
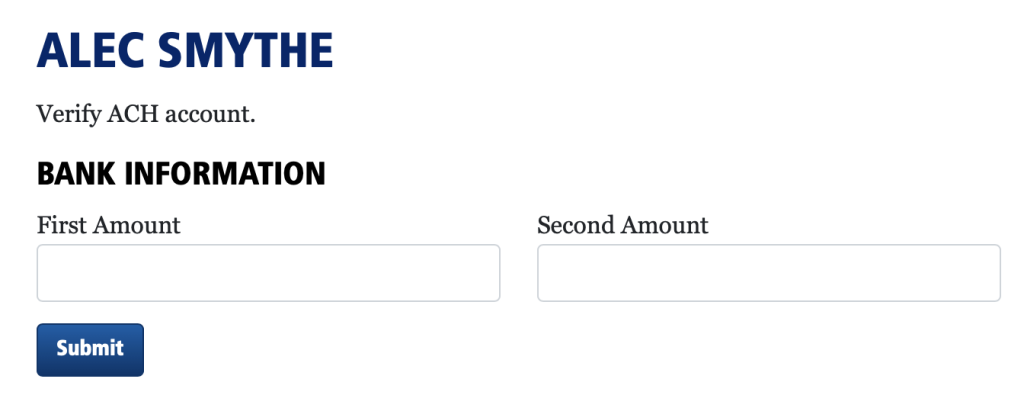
Setting up ACH is a two-step process. First you have to enter your banking information. Then you have to wait a day or two for a couple of micro deposits to show up on your checking account. Once you see those, you then have to come back and use the Verifiy ACH button to enter the two micro deposit amounts to verify that the checking account is yours.
Step 1 :
Login to your club’s website. (You must set up ACH payments from your club website. It is one of the few things you cannot do from the district site.) Once logged in, click on your name in the blue banner to go to your home page. Then click the Setup ACH button. Enter your bank account information.
Step 2 :
Wait a few days and check your bank account. You should see two micro deposits from Stripe. Go back to your club website and login. Click on your name to return to your home page, then click the Verify ACH button. Enter the two micro deposit amounts and Submit. That should do it.
October 3, 2022 2:40 pm
Pages. You can have as many pages as you want. They can appear under either the Our Club or the Causes & Community menus in ‘sort’ order. If you put in a ‘sort’ of zero, it will suppress the page from the menu.
Sub-Pages. Pages can have parents. If a page has a parent, it will show up in the menu beneath the parent page. Don’t make a page a parent of itself.
Tabs. Pages can have tabs. If you create a tab and assign it to a page, it will show up under a tab interface on that page. Tabs show up in sort order. If you give a tab a sort order of zero, it will be suppressed.
Image Library. You can add images to the image library. These can be linked to either pages or tabs. To add Images, go to Admin > Images and click Create. Then select the page (or tab) you want it to appear on. Such images will show up at the top of the page or tab you select.
Inline Images. When updating a page or tab you can also add images inline using the little image icon in the icon bar. These images will automatically be re-sized to fit the page and will appear in the text wherever you added them. They will also be added to the image library.
Carousels. You club can have a slide carousel on the home page. First add the images to the image library. Then go to Admin > Admin Links and choose Carousel Slides from the Other column. Use the Create link to create new slides. You can add a super, a headline, a sub-headline, body copy and potentially a button to the slide. Use the sort field to control the order in which the slides appear. There are three types of slides, Left Align, Right Align and Full Width. Probably best to start with Left Align. They will format like the ones on the Buckhead Rotary carousel. For an example of a Full Width slide, take a look at the Thomasville site.
Resources. The resource library is there is hold any kind of document or attachment, e.g. PDFs, .xlsx or .doc, that sort of thing. You can add resources to pages and tabs. Edit the page or tab and type in the first few characters of the resource title you want to add then click on it from the drop down list. To remove resources, update the page or tab, click the X next to the resource(s) you want to remove and save the page/tab.
Newsletters. Use Admin > Newsletters to create new Newsletters. Use Admin > Stories to create new stories. Check the News Feed? box to make the story appear under News > Feed. Use the Newsletter dropdown to assign the story to a newsletter. Then go back to the Newsletter and click the Publish link so the newsletter will appear under News > Newsletters. Click the Blast link to email a copy of the newsletter to your membership. You can get a PDF version of your newsletter by clicking the PDF button when you are viewing the newsletter.
You can also create PDF newsletters off line using software like Publisher or Word. Make your PDF and then add it to the resource library, marking it as a newsletter under Categories. Then go back to newsletters, create a newsletter and link to the PDF you added to the resource library.
November 6, 2022 3:07 pm
To record attendance
- Go to Admin > Meetings
- Click the checkmark icon at the end of the row of the meeting you want to track. You'll see a page listing your membership with a series of checkboxes in the Attended column. (You can use the Toggle switch to switch all the blanks to A and all the As to blank.)
- As you click the attendance boxes, the attendance status will switch from blank (not attended) to 'A' (Attended) to 'M' (Made up) to 'X' (eXcused) and back to blank.
- When you have recorded everyone's attendance, click Save All. That will show you a summary of the attendance for that meeting. Scroll to the bottom and click the Email Missing button to send out “We Missed You” emails.
- The system will provide a list of your members who should have attended and were absent (and for whom we have a good email address). Uncheck any boxes you want to omit from your email. Then click Send My Blast! In a few seconds you should receive back a REQUEST SUCCESSFUL message.
To record bulk make ups in the bank
- Go to Admin > Make Up Bank
- Click the Bulk link near the theme logo. Add your make ups according to the directions on that page.
To assign make ups to missed meetings
When you record attendance, any make ups in the bank will show up next to the member’s name. Choose the date of the make up you wish to apply and the box will change to M.
If you go to Admin > Make Up Bank, it will list all your members with unassigned, unexpired make ups in the bank. If they have missed any meetings, the dates of the missed meeting(s) will appear on their row. Click on the missed meeting to go to the attendance tracking page and assign that make up to that meeting.
To see your club’s Governor’s Citation:
- Sign into the site and click on the name of your club in the blue banner below your name. That will take you to the club home page.
- Scroll to the bottom of the your club’s home page and click the blue Governor’s Citation button. That will take you to your club’s Governor’s Citation.
If you have ClubAdmin rights, you can update your club’s Governor’s Citation until they are locked for judging. Your total score, shown at the bottom left, will update as you make changes, but be sure to click the Save button to save your changes when you are done.
Click here for a short video on how it works, courtesy of Gordon Owens and the Roswell Rotary Club.
You may enter and update projects at any time except when they are locked for judging. A good practice is to enter your projects into the system early, and then update them later, reporting your final accomplishments as you complete them.
To create or update projects
From your club’s home page, click the Projects button to see your projects. Use the Create link at top right near the theme logo to add additional projects for your club. To update existing projects, click on the pencil icon on the corresponding row.
You also have the option of organizing your projects under Committees. Use the Committees button on your club home page to manage your club’s committees. Then assign each project to the appropriate committee.
Attachments
When you create or update a project, you will be able to add up to five attachments like PDFs or photos or Microsoft Office documents. If you have more than five attachments, add the first five, save the project and then update it again.
If your club is using this site to track individual attendance, it can also use it to keep track of make up requests and to apply make up requests to missed meetings. If your club is using DacDB to track attendance, these instructions do not apply.
To request a make up:
- Login
- Click on your name in the blue banner at the top. That will take you to your home page.
- Scroll to the bottom of your page and click the Make Ups button.
- Complete the form and click Create.
To apply a make up (Club secretaries and other club admins)
- Find the meeting for which you intend to apply make ups
- Click the Attendance link in the ops menu near the theme logo
- A drop down will appear next to the name of any member who missed and has an unused make up in the make up bank. Select the make up you wish to apply from the drop down.
- Click Save All
To manage the make up bank (Club secretaries and other club admins)
- Choose Admin > Make Up Bank
- You will get a list of all the make ups that have not been applied. For members who need a makeup, the date of the missed meeting(s) will be listed. You can click on the dates to be taken directly to the attendance page for that meeting, where you can apply the make up.
- To add make ups in bulk, for example gathered by your sergeant-at-arms, click the Bulk link near the theme logo. You can enter up to ten at a time.
Every Rotarian has one or more “affiliations” with Rotary. Their primary affiliation is their active or honorary membership in a Rotary club. In addition they may have other affiliations, typically related to positions they hold or have held. Some examples include:
- A club officer, e.g., President
- A district officer, e.g., Assistant Governor
- Former membership in this club or another club in District 6900.
We never delete a user from the system. We just terminate their affiliation.
For official Rotary affiliations, the main Rotary system in Chicago is our system of record, so those changes need to be made on rotary.org Each night we download from that system any affiliation changes from the previous day. The sync process is one-way; changes made locally do not get synced up to Rotary. That means most changes to your roster, like new members, terminated members and Rotary officers must be made at rotary.org. However there are many affiliations, like for example Conference Chair, that Rotary does not track. Those changes you would make locally.
On everyone’s home page there is an Affiliations tab, which shows all the affiliations for that member. To add or update an affiliation, click the Update link near the theme logo, then click the Affiliations tab. Click the pencil next to the affiliation you want to change (for example to put in a termination date) or click the blue Add Affiliation button to add an affiliation.
Not everyone can edit Affiliations. In general you need at least ClubAdmin rights to update affiliations within your club and DistrictAdmin rights to update affiliations across the district. Typically the Club officers have ClubAdmin rights and the District team has DistrictAdmin rights.
With auto sync, you make your Roster changes at RI and that night rotary6900.org is automatically updated too. That way you only have to make your entry one time.
To turn on auto sync (look at the attached PDF for more detail):
- Have your current president or secretary go to my.rotary.org and login
- On the home page, click on View Club
- Scroll to the bottom of your club page and look for Club Management Systems. If you see both DACdb and TeamForte, Inc. list, you are all set already.
- If not, click the Edit pencil.
- Click Add Vendor.
- Click TeamForte from the Access granted to list. Click I agree at the bottom. That should do it.
- If you want, you can also add DACdb. Only one vendor can be View & Edit. If you want your changes made at DACdb to sync back to RI, then make it the View & Edit one. TeamForte is read only, so doesn’t matter whether it is set as View-Only or View & Edit.
When all that is done, let our webmaster know and he will configure things on our end to do the actual sync.
Tab Resources:
May 5, 2026 6:25 pm
- Look for Communication > Emails under the white Rotary wheel (admin menu)
- Use the Create link at upper right to create a new blast. Or view an existing blast and use the Clone link to clone it.
- Choose your template (typically Club Blast)
- In the Sender field, enter the first few letters of the sender’s name (typically your last name, but you can send on behalf of others) and then chose the right match from the dropdown
- The Email Date will default to today, but if you want your blast to go out later, put in the date and time you want it to be sent.
- Add your Subject and Body. You can add pictures to the body using the image icon in the Body toolbar. You can also use the wildcards {{first name}}, {{last name}} and {{signature}} to insert the recipient's name and your signature block in the email.
- You can add up to five attachments using the Attachment buttons.
- Click Save
After you have created your Blast, use the blast link to queue it up for sending. You will be presented with a number of lists to choose from. Typically you would just check the box for your club. Then click Continue. You will (eventually) get a list of all your club members. Use the check boxes to select/de-select individual members from receiving your blast. Then click Send My Blast.
The system checks the queue every five minutes, so it may take up to five minutes for your blast to send. Of course if you have queued it for later, it won’t send until the date and time you set.
Before sending the actual blast, it is best practice to do a test. On the page where you are presented the lists, scroll to the bottom and check the Test box, then click Continue. It will say it found just one match (you). Click Send My Blast and it will send you a copy of the blast. Look at the blast in your email program to make sure it looks okay and that any links work.
If everything looks good with your blast, go back to the blast page, click Blast again, select your list, make any adjustments and then click Send My Blast.
October 4, 2024 9:30 am